| Redress Manager 2026 Case Load |
   |
The Case load can be accessed through the Admin menu.
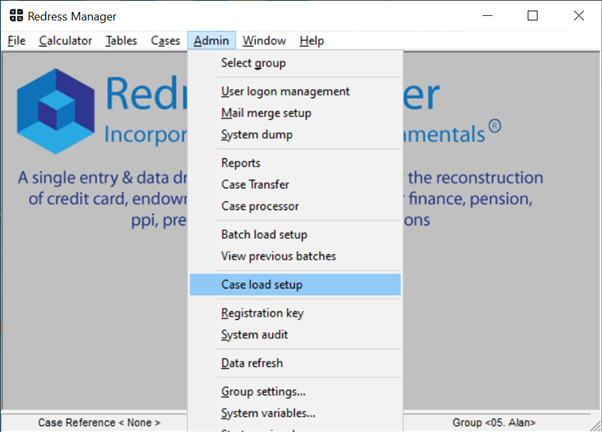
Case load allows details of multiple cases to be imported from an external file or clipboard. Case load templates can be imported and exported. A variety of item types can be selected in the case loader and these fall into the following categories:
■ case information,
■ party details (including multiple applicants)
■ basic case details (including policy provider, multiple periods and repayment types e.g. 0- Interest Only, 1-Repayment)
■ running wizards
■ search tabs allowed existing cases that user has access to, to be updated (searches include surname, internal reference, mortgage reference and policy)
|
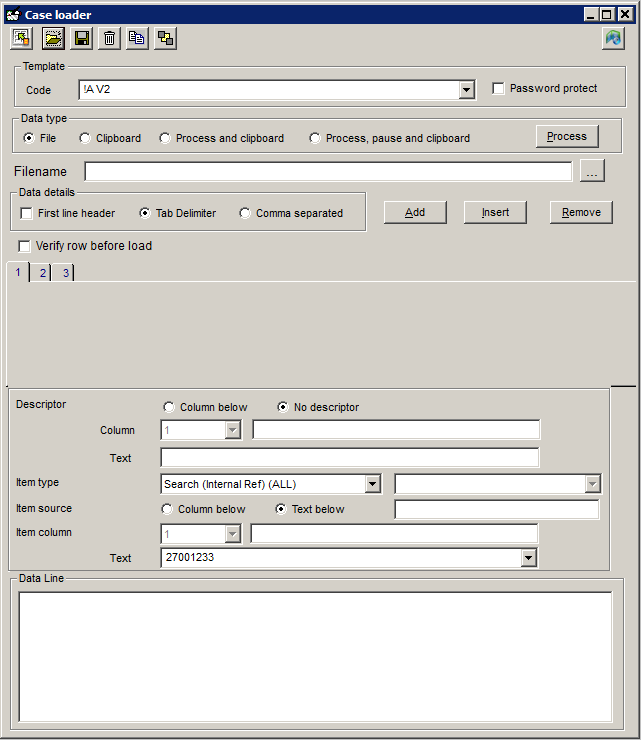
a) |
Select an existing template or create a new one |
|
b) |
Select to add password (will be encrypted). Password can have a length of 30 characters. |
|
c) |
Type of data feed for import |
|
d) |
Runs the case loader |
|
e) |
Specify the source of the csv file |
|
f) |
Refer to the format of your data |
|
g) |
|
|
h) |
Inserts a new tab to enter the details for the next item type in front of the current tab |
|
i) |
Removes the current tab |
|
j) |
Specify how to locate the data required |
|
k) |
Select the item type required |
|
l) |
Select validation options e.g. not blank, valid date, <,>. |
|
|
Load in data from external file |
|
|
Load Case load template |
|
|
Save Case load template |
|
|
Delete Case load template |
|
|
Import/Export template
Exit Case load screen |
|
|
Browse to find file |
|
|
Version Information (including created, modified and imported dates) |
Note:
If the item type is set to any Save or Close items, then these fields do not have to be entries in the source file. The action will be run without referring to the source file.
VB script functions can be used in the ‘Item source’ text entry field. The library of functions can be used to filter data being loaded in.
If “Select form name” is selected as an item type, please ensure that item source is “Text below”. This will allow you to pick the form from the “Text” dropdown menu. This will also allow you to select form item from the dropdown list which is pre-populated (see screenshot above). If this is not selected then the dropdown menu next to the “Select form item” will not be populated.
The Form tabs are numbered from 0,1,2,3….etc. Therefore “set form tab” values will be 0 for the first tab, 1 for the second tab, 2 for the third tab etc.
For the first tab, the “Set form tab” is not required as it defaults to zero.
For the “Set form item”, the first character of the imported value must be “Y” (“Yes” or “Yellow” will import as checked) to check tick boxes, any other value will be imported as unchecked.
Access to the "Load new case" option can be set in the Group setting menu. This option should be used for importing single cases.
In the Cases menu select ‘Load new case’.
Case details will then be imported into the system.
| Copyright© 1994-2026 Exasoft, All rights reserved. | |