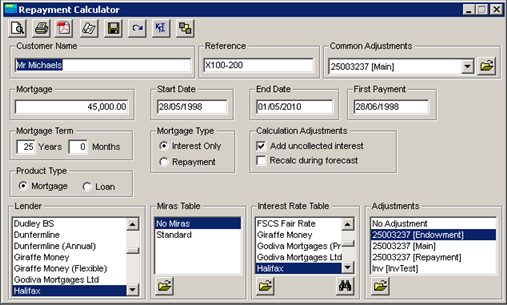
We strongly recommend using the Multi-lender screen for Endowment complaints, unless you need to perform different balance calculations.

This screen is completed as follows (either TAB or clicking using the mouse may be used to move between entry fields):
|
a) |
Clients name as you wish to see on printouts |
|
b) |
Clients Mortgage reference as you wish to see on printouts or to search on |
|
c) |
Common adjustment set to be used for calculations |
|
d) |
Mortgage (the Interest Bearing Balance, which the recalculation / comparison is based on) |
|
e) |
Start date (the first day of recalculation / comparison) |
|
f) |
End date (the date the recalculation / comparison should work to e.g. today or end of mortgage term. If this is not entered then the system will add the term onto the start date) |
|
g) |
First payment (date the first payment was made) |
|
h) |
Mortgage term (original period, years and months) |
|
i) |
Mortgage type (Interest only or Repayment) |
|
j) |
Add uncollected interest. If selected (tick in box) this will add in any uncollected interest to the first payment made. |
|
k) |
Recalc during forecast. If selected (tick in box) this will cause the system to recalculate payments when forecasting a mortgage beyond today (e.g. recalculate repayments, interest bearing balance). |
|
l) |
Lender table - financial institution funds borrowed from (e.g. Bank, Building Society…). When selecting the lender a number of them have multiple options, depending on the lenders (i.e. Annual, Daily). Care is needed when selecting the correct lender. |
|
m) |
MIRAS
table box (place highlighted bar on No MIRAS, Standard or
relevant MIRAS entry for this particular rework (see MIRAS Setup)).
The open icon |
|
n) |
Interest rate table (place highlighted bar on relevant entry for this particular recalculation (see Interest Rate Setup)). The open icon takes you into the Interest setup screen. You
can use the match icon |
|
o) |
Adjustments (leave highlighter bar on No Adjustment or change to the relevant entry for this particular recalculation (see Adjustment Setup)). The open icon takes you into the Adjustment setup screen. |
|
|
|
|
|
Calculate and display results on screen |
|
|
|
|
|
Calculate and print to printer |
|
|
|
|
|
Create PDF file. When selecting this option you will be requested to enter a file name for the file. PDF files replicate printed output and FREE readers are available. |
|
|
|
|
|
Enter notional screen |
|
|
|
|
|
Save current data for client |
|
|
|
|
|
Refresh tables, this should be used when adding new table entries. |
|
|
|
|
|
Produce a basic KFI illustration |
|
|
|
|
|
Exit current screen |

Related Topics
Calculators
Repayment Calculator Screen Output
Repayment Calculator PDF Output


