| Redress Manager 2026 Adjustment Setup |
   |
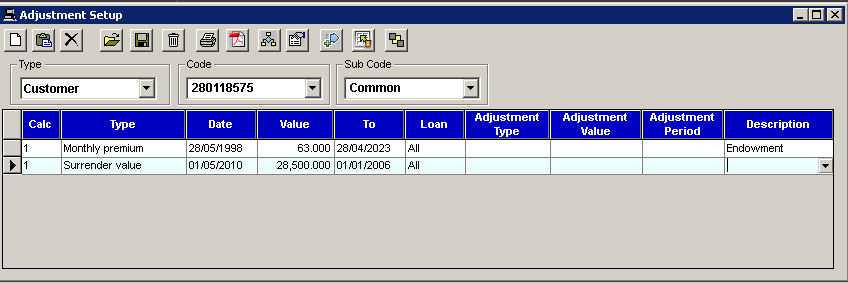
The Adjustment
setup is accessible by clicking any of the ‘Edit adjustments’ icon ![]() on
the multi-lender, investment, rework or consolidation screens.
on
the multi-lender, investment, rework or consolidation screens.
New increase option using tables

|
a) |
Type relates to whether the Adjustment is for a Client or General (Standard rate) |
|
b) |
Code relates to either a client reference number or a general code (Dependant on Type) |
|
c) |
Sub code allows for more than one adjustment for a client (useful when performing comparisons) |
|
d) |
Calc is the number of the calculation the adjustment applies to. ALL is for all calculations (default is 1 - first calculation) |
|
e) |
Type is dependent on the options available. See Adjustment section of the Help File for more details. You can either select the type from the dropdown list or enter the name of the adjustment you wish to use (note: the system has predictive text to select the right adjustment type). |
|
f) |
Date is the From date of the case or the date the adjustment is to be applied. |
|
g) |
Value can be an amount, percentage rate, length in months, or nil depending on the adjustment type chosen |
|
h) |
To, is the to-date, the end date of the adjustment applied. |
|
i) |
Loan is what part of the loan the adjustment is applicable to. This is only relevant to some adjustments as detailed in Appendix A. The default is All but this may be changed to Loan A or Loan B. |
|
j) |
Adjustment type is Amount, Simple %, Compound %, Table %, Table % x 1.5, Table % x 2, Table % x 2.5 or Table % x 3. This can only be used with Monthly premiums, Monthly payments, Annual Accrued Fees and Annual Premiums. |
|
k) |
Adjustment value is either a percentage or amount, this being determined by the adjustment type. |
|
l) |
Adjustment period is when the adjustment value is applied. This can be Annually, Monthly, Quarterly, Year 1, Years 1 - 2, Years 1 - 3, Years 1 - 4, Years 1 - 5 and Years 1 - 10. |
|
m) |
Description can be used to change what is displayed / printed on comparisons. If specified the description will be used. |
Note: See the Adjustment section of the Help File for more details.
|
|
|
|
|
Add new entry to end of table |
|
|
|
|
|
Insert new entry prior to selected entry |
|
|
|
|
|
Delete selected item |
|
|
Retrieve selected table (Code & Type) |
|
|
Save table |
|
|
|
|
|
Delete current table (Should be used with care) |
|
|
|
|
|
Print adjustment set |
|
|
|
|
|
Create PDF file. When selecting this option you will be requested to enter a file name for the file. PDF files replicate printed output and FREE readers are available.
|
|
|
Realigns overlapping rates – This option helps to align rates, for example when there are two adjustments of the same type and one rate is an extension of the other, the first rate is extended to cover the second rate and the second rate is removed.
|
|
|
Removes adjustment duplicates |
|
|
Generate new set of adjustments
Load adjustments into a new set |
|
|
|
|
|
Exit current screen |
|
|
|
Related Topics
| Copyright© 1994-2026 Exasoft, All rights reserved. | |